Spelunking in M&G's Zapiro Archive
Sat, 13/09/2008 - 2:24am — tumbleweedThose who follow me will know that I used to maintain a web frontend to the Mail & Guardian Online Zapiro archive.
M&G used to have a rather crufty website. Subscriber-only content was trivial to access (for non-subscribers), URLs were ugly, and dinosaurs roamed in the far corners of the site. It had RSS feeds, but not an RSS feed for the zapiro archive (or any specific-interest RSS feeds for that matter). I don’t check websites, I read RSS feeds.
Me being a young geek with a little too much spare time, I put together zapiro.rivera.za.net, as a ~200-line PHP script (with no SQL DB) that was really nice to use (in my books) and gave me a Zapiro RSS feed.
When they noticed, the powers at be at M&G weren’t too impressed with it, because it deprived them of eyeballs (and hot-linked their Zapiro images). However I felt satisfied that I was merely providing a fair-use access to their content and allowing people to follow it who wouldn’t have been able to otherwise. The site never got much traffic, so thus far it’s not been a serious problem.
Around June this year, M&G redesigned their website, and I don’t think I even noticed (did I say something about them not having decent feeds?). This redesign broke the machinery in zapiro.rivera.za.net but I didn’t notice that because Zapiro had taken a sabbatical earlier this year, and was going weeks without posting cartoons.
Enough back-story. Point is I took a look at the new M&G Zapiro Archive this evening and was shocked. Before I go into all my problems with it, let me just disclaim that they are rather nit-picky but if these problems weren’t there they site would be a hell of a lot more usable:
- There are still no useful RSS feeds. There is a rather terse selection of general feeds.
- The Archive menu only goes back to 2001. M&G has zapiro cartoons going back to 1999.
- Archive menu URLs are in /Month/Year format. Did anyone even think about URL-scheme when they were designing?
- Their tagging feature while using multi-select widgets only allows single tags to be selected (oh, and it requires Javascript)
- Each cartoon has two URLs. Ok, I guess they weren’t thinking about URL scheme.
- Today’s cartoon has the /zapiro/all/ URL. Yesterdays /zapiro/all/1, etc. going back to the begging of time (currently residing at /zapiro/all/1870). Way to go with permalinks guys. Oh and did you notice that they are all titled “Latest Zapiro”?
- Clicking on the “Comments” link or using the “Archive” menu below takes you to something like /zapiro/fullcartoon/1. Oh, except 1 gives us a non-existent cartoon at the beginning of this Unix Epoch. But take a closer look: it has tags associated. Can anyone say WTF?.
The insanity continues: 2 gives us a cartoon from September 1999. 3-25 are more non-existent wonders, and then things go backwards in time until 36 which jumps us to June 3 2008. (Hmm, I think that may have been around the M&G redesign launch date.)
We move forward in time until 40, when we start moving backwards from May 2008, through many seas of well-tagged gaps, to … well somewhere. (OK, so I got bored and didn’t manually crawl 2000 pages, but would you?) Some cartoons are in totally the wrong position, we randomly move backwards and forwards and sideways.
Finally things settle down, and we go forwards again (with gaps of course) from 2054 to today’s cartoon at 2101 — a fine Zapiro specimen if every I saw one.
Why was I doing all this mind-numbing crawling you ask? Well I wanted to know if I could do anything to make my Zapiro scraper work again. The answer? Not simply. They don’t have any sensible way to locate the cartoon from a specific day, short of crawling the entire archive and recording the URLs found. I don’t think there is any logic to this LSD-induced URL scheme.
URL schemes matter. This seems to be something that the big guns haven’t noticed. I don’t think it’s a co-incidence that the most expensive CMSs out there have the worst URLs, whereas Wordpress and Drupal (with pathauto) encourage sensible URLs and are Open Source.
Sure, most users don’t change what they see in the address bar, but if people are going to link into your site, you should provide nice permalinks. Then, if you want anyone to build anything on top of your site (where anyone includes yourself), it would really help if you had a sane URL scheme. Finally, it gives you geek-cred. :-)
While I think of a better way to get my scraper working again, Happy Spelunking!
September GeekDinner
Fri, 12/09/2008 - 8:58pm — tumbleweedLooks like the September Geekdinner list is filling up nicely. To anyone on the waiting list, keep an eye on that wiki right up to the last moment: we Capetonians are notorious for dropping out at the last minute, especially if the weather is bad. I’d expect a reasonable number of drop-outs - we thought the last dinner was going to be overflowing, and there was still space at the end.
I’ve just done a round of updates on Planet GeekDinner and I’m glad to see a good sprinkling of new faces (or is that geeks with new websites?). If you’d like your GeekDinner related posts to be syndicated on the planet and I’ve missed your blog or got the wrong website please let me know.
Fixing a Digital Camera
Sun, 13/07/2008 - 2:57am — tumbleweedMy brother was talking about buying my Canon Digital IXUS 750 Camera off me. (or PowerShot SD550 for Americans) He had an identical camera and waterproof housing for it (this costs significantly more than the camera). But said waterproof housing had not been properly closed once…
My camera wasn’t having any of that, and the next time I turned it on, it half-opened the lens, groaned, and said “E18”. Bugger. Googling E18 turned up a few sites showing other people with the same problem, lots of other people: e18error.com, E18 Error on Wikipedia. It appears to be a generic error for lens problems in Canon cameras, and occurs so often that class action suits have been filed against Canon.
I read the tales of woe, and tried the suggested remedies of shaking, banging, prodding, and otherwise mauling my poor camera. Nothing helped. I put it in a pelican case and forgot about it for a few weeks.
Reading on, I discovered a few tales of brave owners disassembling and repairing their cameras, mostly successfully. As a geek, I knew I was going to have to give this a shot. I’ve taken things apart since I learned how to use a screwdriver, so I can normally put them back together again (these days), and they normally still work.
Eventually, I got around to this, last week. Nobody has posted disassembly instructions for any camera near my model, so I had to work it out for myself. Now, let’s remedy that:
My Symptoms
My camera’s lens was open, and wouldn’t move at all. Turning it on gave an E18 error.
Preparation

I’d recommend the following:
- An afternoon & evening to yourself
- A large, empty desk (preferably with a lip, to catch dropped screws)
- A lino floor (carpets can lose dropped screws)
- A good desk light
- Lens tissue (or better yet, the wet-wipe version)
- Meths and ear-buds (or other solvent of choice)
- Superglue (in case you break something or something is broken)
- Tweezers, pliers, leatherman, etc. (you are dealing with lots of little things)
- Screwdrivers: small philips-head drivers for screws, and a few tiny flat ones for prying.
- A torch (to help you find dropped screws)
- A third-hand (or at least its magnifying glass)
- A blower/brush (to get rid of dirt)
- A working camera (to document the procedure, so you can put it back together)
- Patience - dropped screws can be hard to find
Warnings: You need to have a willingness to part with your patient’s life. You also need to be aware that camera flash assemblies contain high-voltage capacitors, that usually hold a small residual charge. Stay well clear of them and their circuitry. If possible, discharge it as soon as you see it, with a heavy-duty resistor.
Tips: Lay out the removed parts in the order you disassembled them, together with their screws. That way you won’t have the “left-over screw” problem or put things together in the wrong order.
Disassembly
Remove the battery and SD card.

To remove the case, you need to undo all the exterior screws: 3 on the base, 2 on the left, and 2 on the right (one is under flap C). The side plate A is loose, and B is a plastic sheet that can be pulled out, revealing an additional screw. Flap C is attached to the body, not B. When reassembling, take care to insert lip D under the back panel.
There are no clips on the bottom or sides, but there are 3 along the top, between the front and back halves. One to the right of the shutter, two to the left. Pry up on the front half.
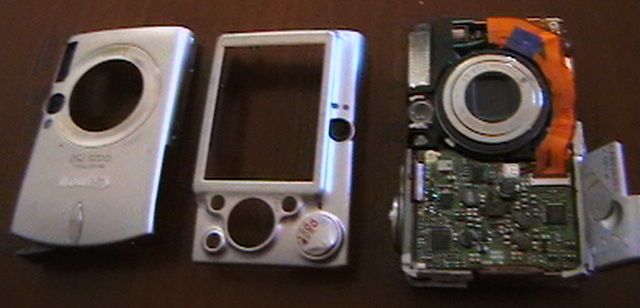
There should be a black O-ring on the outer part of the lens. Lift it off and store.
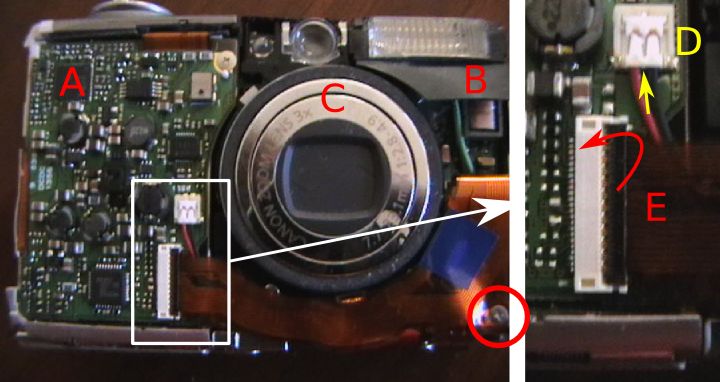
The three main modules are now visible. Motherboard and battery (A), Flash unit (B), and Optics (C). While we won’t undo these connectors quite yet, as the LCD is currently attached to both sides, but this is a good opportunity to explain the connectors that you’ll be encountering.
The ribbon cable E plugs into the white connector with a black lid. The black lid needs to be folded back for the ribbon to be removed. It simply pulls out along it’s axis. To re-insert: open, push in ribbon as far as it’ll go, and close. These connectors are quite delicate, be careful.
There is another type of ribbon connector which simply relies on friction. The LCD back-light cable is an example. You just pull it out with tweezers, and push it back with tweezers (without bending it, if possible).
The flash power lead D must be pulled up, away from the camera. Insert a tiny screwdriver underneath the wires at the point indicated, and pry up.

The buttons are a loose piece of rubber. Lift off.
The LCD needs to be removed first. Pull out the backlight power ribbon (A). Unscrew the screw above the LCD, releasing a bar. The left side has a small clip that needs to be released, and then the LCD-backlight assembly should lift upwards. The right hand side has a lip under the keypad module, so lift the left side first. You won’t be able to disconnect the LCD ribbon until you remove the keypad plate.
Unscrew the 2 screws at the top of the keypad plate. There are a few clips holding the bottom in place (arrowed). But you should be able to pull the plate away, revealing the ribbon connectors for both units. Unplug them both.
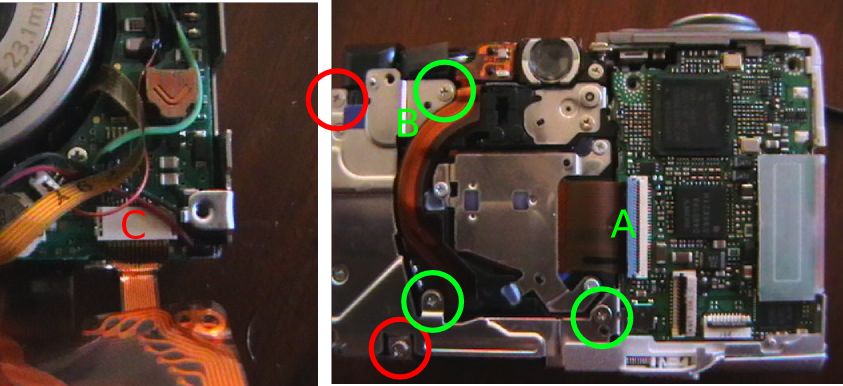
The Flash unit can now be removed. Unplug the cables shown earlier, as well as the screw on the bottom right-corner. The ribbon plugs into the flash unit, unplug (C).
The left two screws on the back (red) will release the flash unit.
Before unscrewing the optical assembly, open the CCD ribbon connector (A). When re-attaching the module, the cable should again be inserted first, and locked last.
The three (green) screws on the metal frame will release the optical module. Beware a tiny spring hiding under B. Lift it out, and store it.
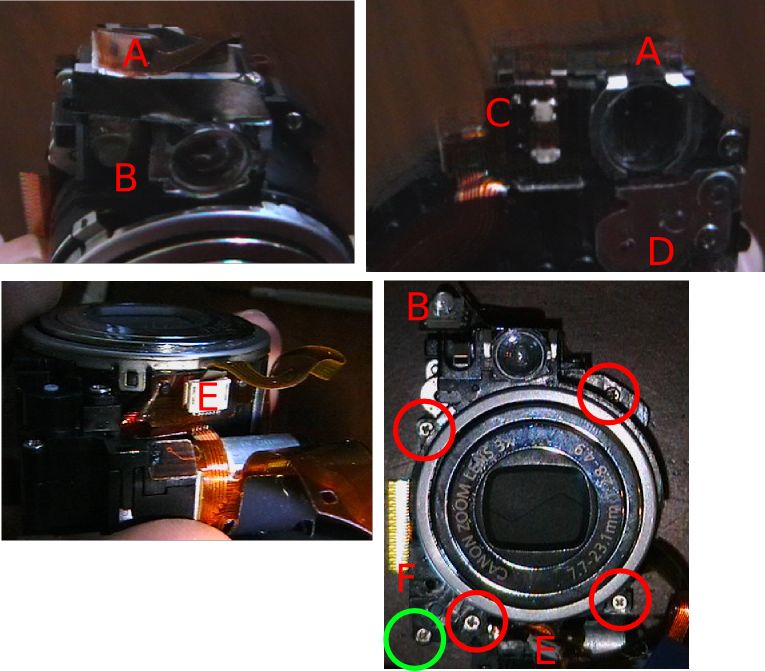
Before we can take the Optical assembly apart, the focussing LED has to be removed. Unstick ribbon A, and pry up the LED (B). Continue lifting the ribbon, unsticking the status LED section (C), too.
While we are here, the focussing servo’s cogs are under D, if you are cog-cleaning. Don’t open if you don’t need to.
Unplug (pull) the shutter-ribbon from E, and unstick E’s ribbon from the lens-body.
The lens and viewfinder assembly can now be removed from the base-plate with the CCD and motors. Unscrew the 4 screws and one on the base. The long screw comes from near F. Lift up the lens carefully. A small black cog will be loose near F. Remove and store.
The green screw gives access to the zoom servo’s cogs. Don’t open unless you need to.
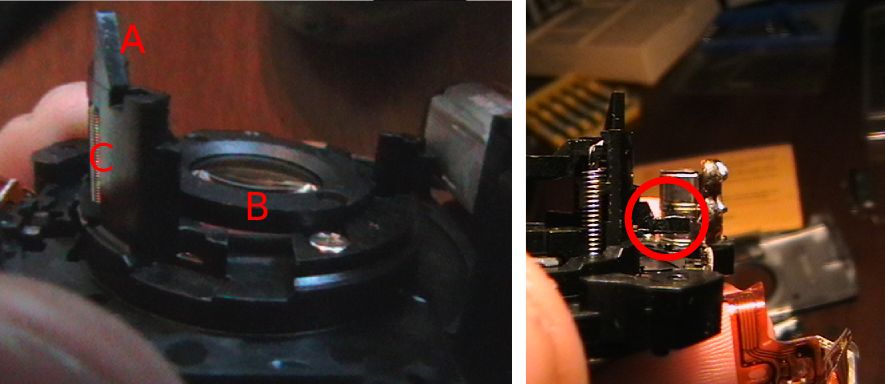
On the CCD base, the sharp bit (A) activates the lens-cap mechanism in the lens, when it’s closed. The lens element (B) is for focussing, and in my case it’s sitting at an odd angle, because the short pin (circled) had broken, and had to be glued back in place. This pin passes through an IR light-switch when the lens is at a certain hight, allowing the camera to calibrate its focus.
Check that the focussing element moves up and down smoothly when you rotate the thread below A.
While you are here, blow any dust off the lens and CCD below it.

To disassemble the lens: Un-thread the ribbon. Roll the big cog on the side until it’s fully closed, and clicks, revealing the pins of the inner rings, and push the outermost interior ring of the lens backwards from the front. It should pop out.
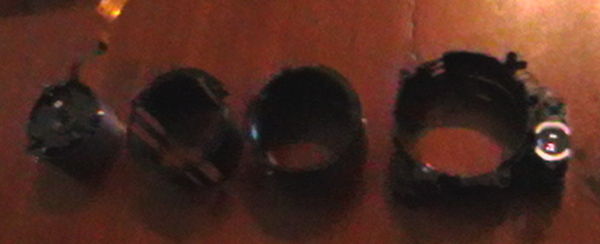
The rings either simply pop out backwards, or have a track leading to the surface. Clean all the tracks and pins.
If you are having shutter-trouble, you can open the innermost module, but beware it’s delicate. If the lens-cap is jamming, operate it a bit with a screwdriver (wiggle), blow air at it, etc until it works cleanly.
Reassembly
Finally, if you found your problem, reassemble.
Remember to rethread the lens ribbon before you attach the outermost ring. The lens should operate smoothly when zoomed with the big cog. It’s easiest if you attach it to the CCD plate in the opened state.
The camera behaves well, and can be tested disassembled. If you are having E18 trouble, you can just connect the lens to the motherboard, insert the battery, and turn it on. If it’s working, the lens should open, and close when turned off (and the power button LED should go out promptly, if it doesn’t you haven’t found the trouble yet).
Enjoy your newly fixed camera. I am, mine.
An open letter to NatWest bank
Wed, 28/05/2008 - 6:27pm — tumbleweedSubject: Strict Browser restrictions
Hi, I’m a customer of yours, and a GNU/Linux user who gets frequently frustrated by your browser detection.
Basically, the problem is that very few web browsers have been certified with your website. Now, I have no real issue with that, nobody has enough time to try every web browser in the world, and adjust their websites to fit around every browser’s bugs. But that doesn’t mean it’s acceptable to reject your users with a message like “The Internet browser you are using is not supported by online banking. Use the link below to see the complete list of browsers we support.”
Firstly, the browsers I use are listed as being supported on your list [1]:
- On this laptop, I use a Firefox 3.0 beta. Firefox 3.0 is listed is being supported, and it works (if I tweak it to identify it as Firefox 2.0, then I can use the site just fine).
- On my desktops, I use Iceweasel 2.x. Iceweasel is Firefox with a different name, to get around trademark issues. Ask your Linux-techies, they should know about it. Again, it works as expected.
Secondly, [1] states: “Netscape, Mozilla and Firefox users with other operating systems such as Linux may also be able to access the service.” How are we supposed to access the service if you deny us access?
More generally, locking out unknown browsers goes completely against your policy of Accessibility [2]. While the WAI [3] doesn’t specifically recommend against turning away unknown browsers, I think you’ll find that’s because the authors didn’t even dream of considering such a thing. The entire point of WAI, is to make your site as portable as possible, and to work for everyone with a far wider variety of user agents than you could ever test with.
I don’t know how you can call yourself WAI-compliant and reject un-“certified” browsers. Your webmasters should hang their heads in shame.
Now, I don’t intend to rant any more than that, because that’s the only problem I have with your site (and your service). Beyond this little niggle (which stops me being able to bank, without configuring my browser to lie) I’m very impressed with your services.
Please sort this out, it’ll turn me back into a happy customer.
SR
PS: I’d have sent this by e-mail, where I’d, but you don’t provide any e-mail contact details on your site. PPS: Only providing a small feedback form doesn’t help users give you real feedback, it just intimidates and irritates them.
1: http://www.natwest.com/personal/day-to-day/online-banking/g1/faqs.ashx
2: http://www.natwest.com/popup/global/access.ashx
3: http://www.w3.org/TR/WAI-WEBCONTENT/—
Stefano Rivera
http://rivera.za.net/
H: +27 21 794 7937 C: +27 72 419 8559
Now, that was rather harsh to them, but this has been irritating me for ages. Then, when I did decide to do something about it, I was rather worked up, and ranted.
I got a call back from NatWest this morning, and was basically told that they aren’t going to change anything. I can understand their position, but I don’t that they were seeing mine. (Oh, and I think they are wrong.)
The reasons I was given for this non-approved lockout are:
- Support. But of course, if your web site is decent, then you shouldn’t have any support issues. (OK, that’s rather utopic, but the kind of people who use alternative browsers will be OK in such situations).
- Security. Apparently Opera caches previously visited pages as they were. Clicking back doesn’t revalidate with the server, and so someone who’s logged out of their Internet banking and gone on to google still has their private data visible in the history. Anyone coming up to their computer can go back to it.
Now, I don’t think point 2 is NatWest’s problem. If Opera doesn’t support revalidation, then Opera must fix it. If Opera do, and NatWest doesn’t send the correct Pragma headers, then it’s NatWest’s problem.
But still, that doesn’t mean you lock-out untested browers, dammit. Especially if you call yourself WAI-compliant.
I’d love to see some feedback from a WAI board member on this type of issue. I don’t think the WAI specs address it.
Oh, and everyone, please stand up for your right to browse the web however you see fit. If more people did so, these kind of issues would crop up less often.
Gammu with Samsung
Tue, 29/04/2008 - 10:33pm — tumbleweedA housemate of mine got a new Samsung phone on the weekend. Being a resident geek, I offered to transfer her contacts across rather than get her sister to manually retype 500-odd contacts.
Naturally, I thought this would be a simple problem, right? I mean, everyone updates their phones every 2 years, this must be a pretty common use case. All my Sony Ericsson phones have had a “send all contacts by Bluetooth” option since the inception of Bluetooth. Naturally, it didn’t have such a feature, it only supports sending one contact at a time. (Although, to Samsung’s credit, the new phone will be able to do for the next upgrade)
Next option: I’ll sync old phone to laptop to new phone.
The Samsung website has a helpful Windows utility that you can download to do this, however you need the cable to link the phone to the computer. The phones needed different cables, and I had neither. My laptop with a Windows partition has had broken Bluetooth ever since its motherboard got replaced. So that wasn’t an option. The phones don’t have IRDA, so there was no way to connect them with the Windows laptop.
Time to do it properly.
I tried wammu, a python-based gammu GUI. It supported the phones via the “blueat” driver, and could browse their SIM cards fine, but not their internal Phonebooks. It couldn’t back them up either. A bit of poking around with gammu on the command line showed that the internal phone books are not 0-indexed (normal computer counting, 0 to n-1) or 1-indexed (normal human counting, 1 to n), but 2-indexed. Dijkstra would turn in his grave!
At this point, I could see that I was going to have to write my own, backup utility. The output of gammu was awkable, but seeing as there are good gammu-python bindings, I decided to do it in pure Python.
Reading the address book went something like this:
sm = gammu.StateMachine()
sm.ReadConfig(3, 0)
sm.Init()
old = []
for i in range(2, 587):
old.append(sm.GetMemory("ME", i))
pickle.dump(old, file("phonebook.dump", "w"))
The 3 signifies gammu configuration number 3, read into position 0. 587 is the number of address book entries. “ME” means internal memory. I then pickled “old” in preparation for the next stage. Here is an example of an item in old:
‘Type’: ‘Text_FirstName’,
‘Value’: u‘Foo’},
{‘AddError’: 796160623,
‘Type’: ‘Text_LastName’,
‘Value’: u‘Bar’},
{‘AddError’: 796160623,
‘SMSList’: [],
‘Type’: ‘Number_Other’,
‘Value’: u‘0211234567’,
‘VoiceTag’: 0},
{‘Type’: ‘Category’, ‘Value’: 0}],
‘Location’: 2,
‘MemoryType’: ‘ME’}
Pretty icky, but at least all the information is there. At this point, one should be able to feed it into the new phone:
sm = gammu.StateMachine()
sm.ReadConfig(4, 0)
sm.Init()
for i in old:
sm.AddMemory(i)
However nothing I tried worked, I always got an “Invalid Location” error. I think the 2-indexing is trumping gammu again.
Next idea, lets munge the data into vCard format and use wammu / gammu’s “import from vCard” function. (Code coming up soon) Turns out this doesn’t work either. The phone only received the First name, first phone number, and various other things that I didn’t send it (i.e. custom ring tones that it made up). Hmph!
Aha, but cellphones can normally Bluetooth vCards to each other. So I pushed it the vCard collection via obexftp. Starts transmitting, but then the phone reboots. I played around a bit, and found that if you send it more than one vCard in a vCard file, it reboots. Lovely.
So my final solution was: Extract address book with python-gammu. Transform into vCards. Send each one individually. At least the phone had a “trust this device” option so that it wouldn’t prompt the user for every vCard I sent, but just automatically import them - the first sensible feature I’ve found on it.
Here goes:
import os, pickle, time
def normalise_num(n):
"Neaten up the phone number, internationalise, etc."
if n.startswith("+"):
return n
if n.startswith("00"):
return "+" + n[2:]
if len(n) == 10 and n[0] == "0":
return "+27" + n[1:]
return n
d = pickle.load(file("phonebook.dump", "r"))
# Normalise into a sensible format:
o = []
for i in d:
t = {}
for j in i["Entries"]:
if j["Type"] == "Text_FirstName":
t["First"] = j["Value"]
if j["Type"] == "Text_LastName":
t["Last"] = j["Value"]
if j["Type"] == "Number_Other":
n = normalise_num(j["Value"])
type = "Home"
if n[3] in ("7", "8"):
type = "Cell"
if type not in t:
t[type] = []
t[type].append(n)
o.append(t)
# Write & Send vCards:
for i in o:
f = file("temp.vcf", "w")
f.write("BEGIN:VCARD\n")
f.write("VERSION:2.1\n")
f.write("N:%s;%s;;;\n" % (i.get("Last", ""), i.get("First", "")))
pref = ";PREF"
for j in i["Cell"]:
f.write("TEL;CELL%s:%s\n" % (pref, j))
pref=""
for j in i["Home"]:
f.write("TEL;HOME%s:%s\n" % (pref, j))
pref=""
f.write("END:VCARD\n")
f.close()
os.system("obexftp -b 00:DE:AD:00:BE:EF -p temp.vcf")
# Give the thing a chance to recover:
time.sleep(0.1)
Yes, the normalisation could be done with list comprehensions, but it would be horrible to read. And there might by Python Obex bindings, but I couldn’t be bothered.
I got to spend an afternoon messing with dodgy Cellphones, rather than having a teenager do the job for free. I think I chose the wrong option, but at least it was fun.
Footnote: Samsung, your phones User Interface is awful. Why on earth is Bluetooth under “Applications” rather than “Settings”? I searched everywhere but there, and finally googled before I found it…

Recent comments
13 years 22 weeks ago
13 years 24 weeks ago
13 years 30 weeks ago
13 years 34 weeks ago
13 years 44 weeks ago
13 years 45 weeks ago
13 years 46 weeks ago
13 years 46 weeks ago
14 years 4 weeks ago
14 years 18 weeks ago