howto
Fixing a Digital Camera
Sun, 13/07/2008 - 2:57am — tumbleweedMy brother was talking about buying my Canon Digital IXUS 750 Camera off me. (or PowerShot SD550 for Americans) He had an identical camera and waterproof housing for it (this costs significantly more than the camera). But said waterproof housing had not been properly closed once…
My camera wasn’t having any of that, and the next time I turned it on, it half-opened the lens, groaned, and said “E18”. Bugger. Googling E18 turned up a few sites showing other people with the same problem, lots of other people: e18error.com, E18 Error on Wikipedia. It appears to be a generic error for lens problems in Canon cameras, and occurs so often that class action suits have been filed against Canon.
I read the tales of woe, and tried the suggested remedies of shaking, banging, prodding, and otherwise mauling my poor camera. Nothing helped. I put it in a pelican case and forgot about it for a few weeks.
Reading on, I discovered a few tales of brave owners disassembling and repairing their cameras, mostly successfully. As a geek, I knew I was going to have to give this a shot. I’ve taken things apart since I learned how to use a screwdriver, so I can normally put them back together again (these days), and they normally still work.
Eventually, I got around to this, last week. Nobody has posted disassembly instructions for any camera near my model, so I had to work it out for myself. Now, let’s remedy that:
My Symptoms
My camera’s lens was open, and wouldn’t move at all. Turning it on gave an E18 error.
Preparation
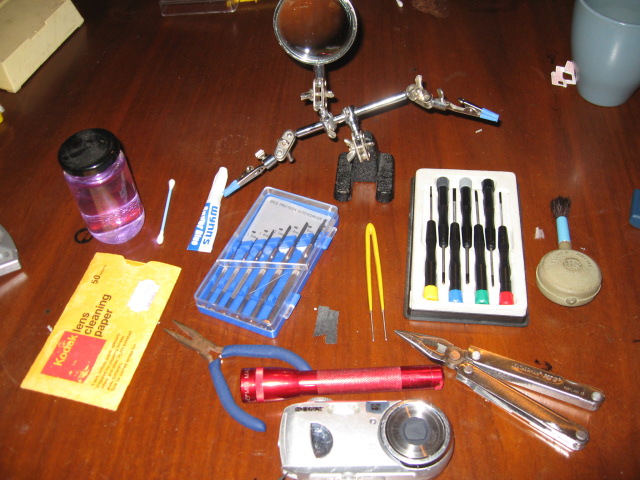
I’d recommend the following:
- An afternoon & evening to yourself
- A large, empty desk (preferably with a lip, to catch dropped screws)
- A lino floor (carpets can lose dropped screws)
- A good desk light
- Lens tissue (or better yet, the wet-wipe version)
- Meths and ear-buds (or other solvent of choice)
- Superglue (in case you break something or something is broken)
- Tweezers, pliers, leatherman, etc. (you are dealing with lots of little things)
- Screwdrivers: small philips-head drivers for screws, and a few tiny flat ones for prying.
- A torch (to help you find dropped screws)
- A third-hand (or at least its magnifying glass)
- A blower/brush (to get rid of dirt)
- A working camera (to document the procedure, so you can put it back together)
- Patience - dropped screws can be hard to find
Warnings: You need to have a willingness to part with your patient’s life. You also need to be aware that camera flash assemblies contain high-voltage capacitors, that usually hold a small residual charge. Stay well clear of them and their circuitry. If possible, discharge it as soon as you see it, with a heavy-duty resistor.
Tips: Lay out the removed parts in the order you disassembled them, together with their screws. That way you won’t have the “left-over screw” problem or put things together in the wrong order.
Disassembly
Remove the battery and SD card.
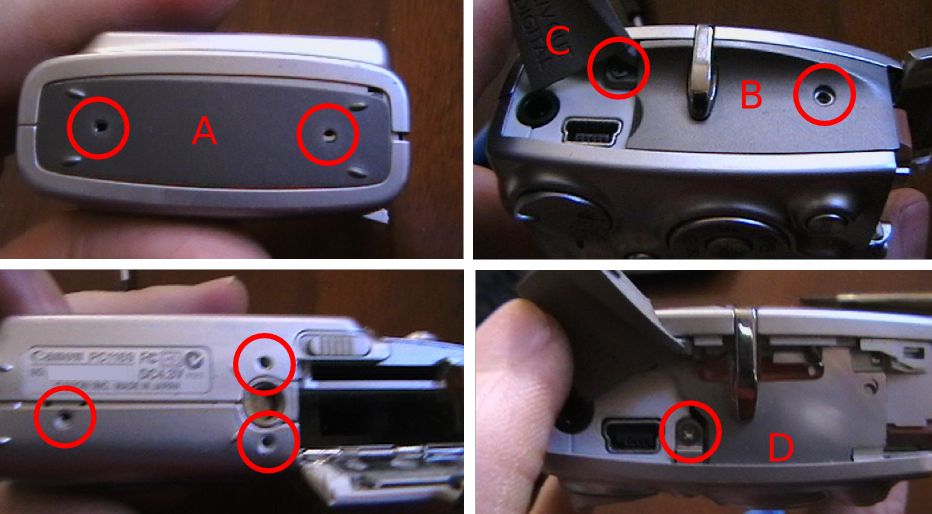
To remove the case, you need to undo all the exterior screws: 3 on the base, 2 on the left, and 2 on the right (one is under flap C). The side plate A is loose, and B is a plastic sheet that can be pulled out, revealing an additional screw. Flap C is attached to the body, not B. When reassembling, take care to insert lip D under the back panel.
There are no clips on the bottom or sides, but there are 3 along the top, between the front and back halves. One to the right of the shutter, two to the left. Pry up on the front half.
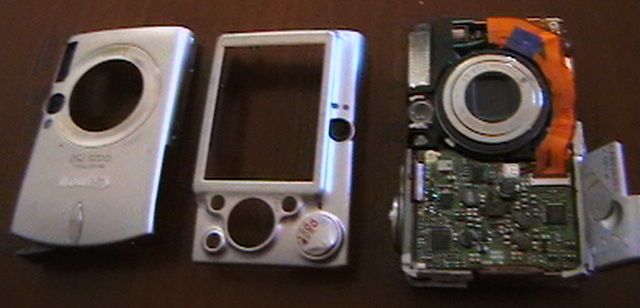
There should be a black O-ring on the outer part of the lens. Lift it off and store.
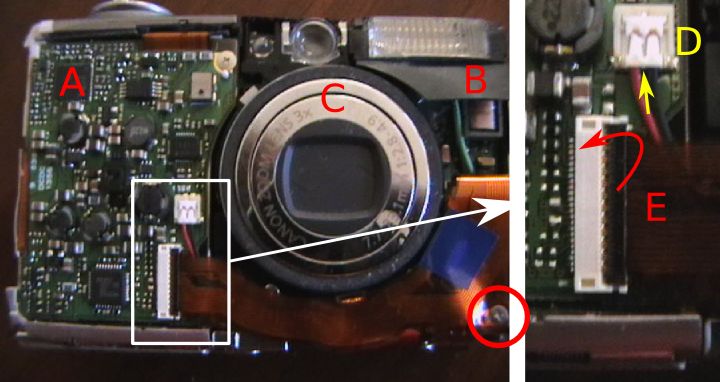
The three main modules are now visible. Motherboard and battery (A), Flash unit (B), and Optics (C). While we won’t undo these connectors quite yet, as the LCD is currently attached to both sides, but this is a good opportunity to explain the connectors that you’ll be encountering.
The ribbon cable E plugs into the white connector with a black lid. The black lid needs to be folded back for the ribbon to be removed. It simply pulls out along it’s axis. To re-insert: open, push in ribbon as far as it’ll go, and close. These connectors are quite delicate, be careful.
There is another type of ribbon connector which simply relies on friction. The LCD back-light cable is an example. You just pull it out with tweezers, and push it back with tweezers (without bending it, if possible).
The flash power lead D must be pulled up, away from the camera. Insert a tiny screwdriver underneath the wires at the point indicated, and pry up.
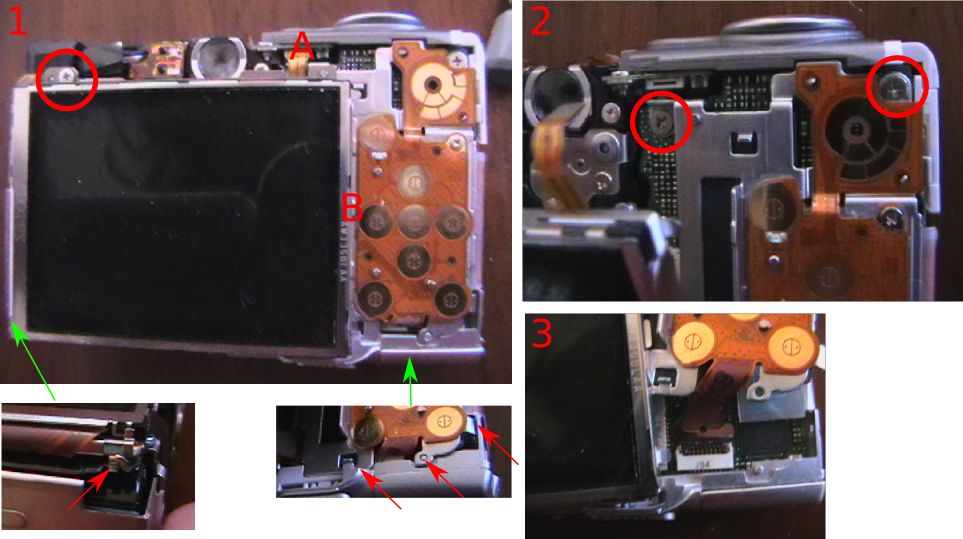
The buttons are a loose piece of rubber. Lift off.
The LCD needs to be removed first. Pull out the backlight power ribbon (A). Unscrew the screw above the LCD, releasing a bar. The left side has a small clip that needs to be released, and then the LCD-backlight assembly should lift upwards. The right hand side has a lip under the keypad module, so lift the left side first. You won’t be able to disconnect the LCD ribbon until you remove the keypad plate.
Unscrew the 2 screws at the top of the keypad plate. There are a few clips holding the bottom in place (arrowed). But you should be able to pull the plate away, revealing the ribbon connectors for both units. Unplug them both.
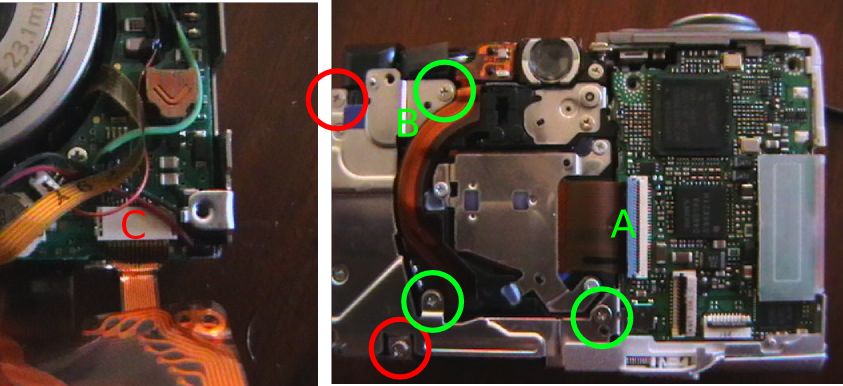
The Flash unit can now be removed. Unplug the cables shown earlier, as well as the screw on the bottom right-corner. The ribbon plugs into the flash unit, unplug (C).
The left two screws on the back (red) will release the flash unit.
Before unscrewing the optical assembly, open the CCD ribbon connector (A). When re-attaching the module, the cable should again be inserted first, and locked last.
The three (green) screws on the metal frame will release the optical module. Beware a tiny spring hiding under B. Lift it out, and store it.
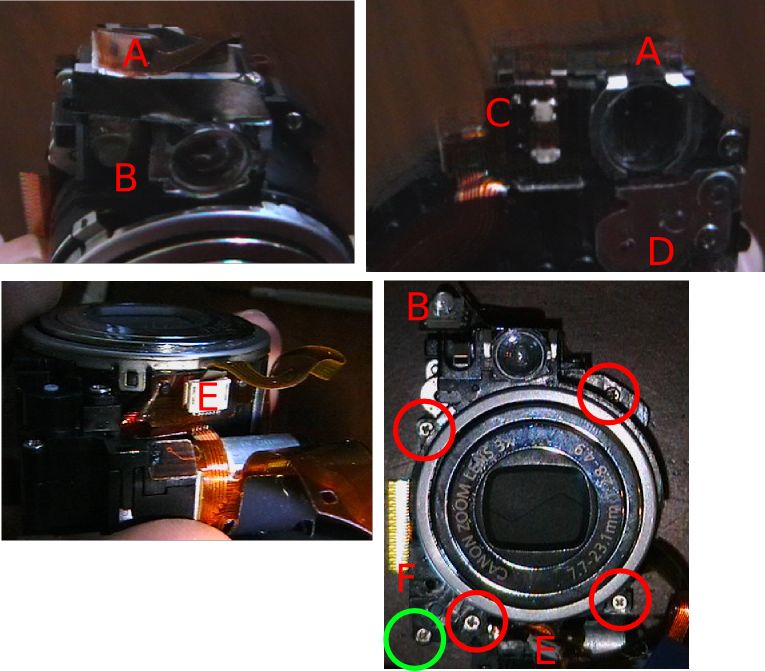
Before we can take the Optical assembly apart, the focussing LED has to be removed. Unstick ribbon A, and pry up the LED (B). Continue lifting the ribbon, unsticking the status LED section (C), too.
While we are here, the focussing servo’s cogs are under D, if you are cog-cleaning. Don’t open if you don’t need to.
Unplug (pull) the shutter-ribbon from E, and unstick E’s ribbon from the lens-body.
The lens and viewfinder assembly can now be removed from the base-plate with the CCD and motors. Unscrew the 4 screws and one on the base. The long screw comes from near F. Lift up the lens carefully. A small black cog will be loose near F. Remove and store.
The green screw gives access to the zoom servo’s cogs. Don’t open unless you need to.

On the CCD base, the sharp bit (A) activates the lens-cap mechanism in the lens, when it’s closed. The lens element (B) is for focussing, and in my case it’s sitting at an odd angle, because the short pin (circled) had broken, and had to be glued back in place. This pin passes through an IR light-switch when the lens is at a certain hight, allowing the camera to calibrate its focus.
Check that the focussing element moves up and down smoothly when you rotate the thread below A.
While you are here, blow any dust off the lens and CCD below it.
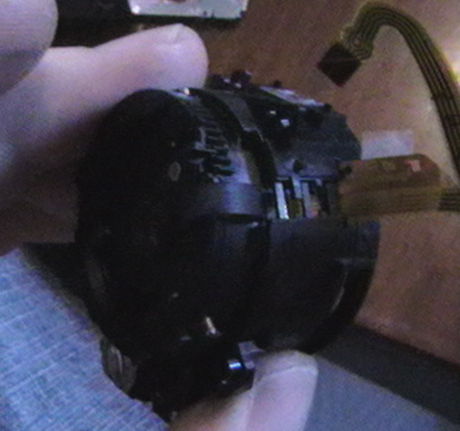
To disassemble the lens: Un-thread the ribbon. Roll the big cog on the side until it’s fully closed, and clicks, revealing the pins of the inner rings, and push the outermost interior ring of the lens backwards from the front. It should pop out.
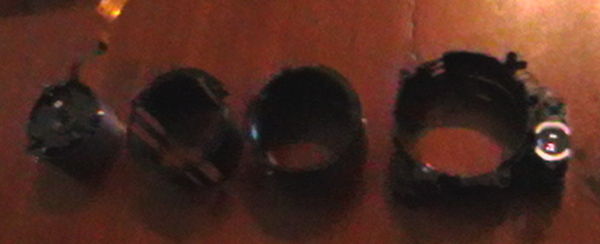
The rings either simply pop out backwards, or have a track leading to the surface. Clean all the tracks and pins.
If you are having shutter-trouble, you can open the innermost module, but beware it’s delicate. If the lens-cap is jamming, operate it a bit with a screwdriver (wiggle), blow air at it, etc until it works cleanly.
Reassembly
Finally, if you found your problem, reassemble.
Remember to rethread the lens ribbon before you attach the outermost ring. The lens should operate smoothly when zoomed with the big cog. It’s easiest if you attach it to the CCD plate in the opened state.
The camera behaves well, and can be tested disassembled. If you are having E18 trouble, you can just connect the lens to the motherboard, insert the battery, and turn it on. If it’s working, the lens should open, and close when turned off (and the power button LED should go out promptly, if it doesn’t you haven’t found the trouble yet).
Enjoy your newly fixed camera. I am, mine.
My first (real) debian repo
Thu, 03/04/2008 - 12:01am — tumbleweedUp to now, whenever I've needed a backport or debian recompile, I've done it locally. But finally last night, instead of studying for this morning's exam, I decided to do it properly.
The tool for producing a debian archive tree is reprepro. There are a few howtos out there for it, but none of them quite covered everything I needed. So this is mine. But we'll get to that later, first we need to have some packages to put up.
For building packages, I decided to do it properly and use pbuilder. Just install it:
Make the following changes to /etc/pbuilderrc:
DEBEMAIL="Your Name <you@example.com>"
The first, to point to your local mirror, and the second to credit you in the packages.
Then, as root:
Now, we can build a package, lets build the hello package:
$ gpg --recv-key 3EF23CD6
$ dget -x http://ftp.uk.debian.org/debian/pool/main/h/hello/hello_2.2-2.dsc
dpkg-source: extracting hello in hello-2.2
dpkg-source: unpacking hello_2.2.orig.tar.gz
dpkg-source: applying ./hello_2.2-2.diff.gz
$ cd hello-2.2/
$ debchange -n
dget and debchange are neat little utilities from devscripts. You can configure them to know your name, e-mail address, etc. If you work with debian packages a lot, you'll get to know them well. Future versions of debchange support --bpo for backports, but we use -n which means new package. You should edit the version number in the top line to be a backport version, i.e.:
* Rebuild for etch-backports.
-- Your Name <you@example.com> Wed, 2 Apr 2008 22:24:30 +0100
Now, let's build it. We are only doing a backport, but if you were making any changes, you'd do them before the next stage, and list them in the changelog you just edited:
$ dpkg-source -sa -b hello-2.2-2~bpo/
$ sudo pbuilder build hello_2.2-2~bpo-sr.1.dsc
Assuming no errors, the built package will be sitting in /var/cache/pbuilder/result/.
Now, for the repository:
$ cd ~/public_html/backports
$ mkdir conf
$ cat > conf/distributions << EOF
Origin: Your Name
Label: Your Name's Backports
Suite: stable-backports
Codename: etch-backports
Version: 4.0
Architectures: i386 all source
Components: main
Description: Your Name's repository of etch backports.
SignWith: ABCDABCD
NotAutomatic: yes
EOF
This file defines your repository. The codename will be the distribution you list in your sources.list. The version should match it. The architectures are the architectures you are going to carry - "all" refers to non-architecture-specific packages, and source to source packages. I added amd64 to mine. SignWith is the ID of the GPG key you are going to use with this repo. I created a new DSA key for the job. NotAutomatic is a good setting for a backports repo, it means that packages won't be installed from here unless explicitly requested (via package=version or -d etch-backports).
Let's start by importing our source package:
$ debsign -kABCDABCD hello_2.2-2~bpo-sr.1.dsc
$ cd ~/public_html/backports
$ reprepro -P optional -S devel --ask-passphrase -Vb . includedsc etch-backports /tmp/packaging/hello_2.2-2~bpo-sr.1.dsc
(There is currently a known bug in reprepro's command-line handling. -S and -P are swapped.)
Now, let's import our binary package:
Reprepro can be automated with it's processincoming command, but that's beyond the scope of this howto.
Test your new repository, add it to your /etc/apt/sources.list
# aptitude install hello=2.2-2~bpo-sr.1
Enjoy. My backports repository can be found here.
Easy home transparent proxy
Sat, 19/01/2008 - 6:01pm — tumbleweedEveryone in South Africa wants to save a little more bandwidth, as low traffic caps are the rule of the day (esp if you are hanging off an expensive 3G connection).
While the "correct" thing to do is to use wpad autodetection, and thus politely request that users use your proxy, this isn't always an option:
- Firefox doesn't Autodetect Proxies by default
- Autodetection doesn't behave well for many roaming users (firefox should talk to network-manager)
- Many programs simply don't support wpad.
- Your upstream ISP transparently proxies anyway (the norm in ZA), so it's not like we have any end-to-endness to protect.
So, here's how you do it:
- Lets assume your network is 10.1.1.0/24, and the squid box is 10.1.1.1 on eth0
- Install squid (
aptitude install squid), configure it to have a reasonably large storage pool, give it some sane ACLs, etc. - Add
http_port 8080 transparenttosquid.conf(orhttp_port 10.1.1.1:8080 transparentif you are using explicithttp_portoptions) invoke-rc.d squid reload- Add the following to your iptables script:
If you run squid on your network's default gateway, then you are done. Otherwise, if you have a separate router, you need to do the following on the router:
- Add a new
transproxtable to/etc/iproute2/rt_tables, i.e.1 transprox - Pick a new netfilter MARK value, i.e. 0x04
- Add the following to the router's iptables script:
iptables -t mangle -F PREROUTING
iptables -t mangle -A PREROUTING -i br-lan -s ! 10.1.1.1 -d ! 10.1.1.0/24 -p tcp --dport 80 -j MARK --set-mark 0x04
ip route del table transprox
ip route add default via 10.1.1.1 table transprox
ip rule del table transprox
ip rule add fwmark 0x04 pref 10 table transprox
- Done: test and tail your squid logs
The reason we use iproute rules rather than iptables DNAT is that you lose destination-IP information with a DNAT (like the envelope of an e-mail).
An alternative solution is to run tinyproxy on the router (with the transparent option, enabled in ubuntu but not debian), use the REDIRECT rule above on the router, to redirect to the tinyproxy, and have that upstream to the squid. But tinyproxy requires some RAM, and on a WRT54 or the likes, you don't have any of that to spare...
Should you need to temporarily disable this for any reason:
- With all-in-one-router:
iptables -t nat -F PREROUTING - With the separate router:
iptables -t mangle -F PREROUTING