technical
The joy that is SysRq
Mon, 06/10/2008 - 1:31pm — tumbleweedI’m constantly surprised when I come across long-time Linux users who don’t know about SysRq. The Linux Magic System Request Key Hacks are a magic set of commands that you can get the Linux kernel to follow no matter what’s going on (unless it has panicked or totally deadlocked).
Why is this useful? Well, there are many situations where you can’t shut a system down properly, but you need to reboot. Examples:
- You’ve had a kernel OOPS, which is not quite a panic but there could be memory corruption in the kernel, things are getting pretty weird, and quite honestly you don’t want to be running in that condition for any longer than necessary.
- You have reason to believe it won’t be able to shut down properly.
- Your system is almost-locked-up (i.e. the above point)
- Your UPS has about 10 seconds worth of power left
- Something is on fire (
lp0possibly?) - …Insert other esoteric failure modes here…
In any of those situations, grab a console keyboard, and type Alt+SysRq+s (sync), Alt+SysRq+u (unmount), wait for it to have synced, and finally Alt+SysRq+b (reboot NOW!). If you don’t have a handy keyboard attached to said machine, or are on another continent, you can
In my books, the useful SysRq commands are:
- b
- Reboot
- f
- Call the oom_killer
- h
- Display SysRq help
- l
- Print a kernel stacktrace
- o
- Power Off
- r
- Set your keyboard to RAW mode (required after some X breakages)
- s
- Sync all filesystems
- u
- Remount all filesystems read-only
- 0-9
- Change console logging level
In fact, read the rest of the SysRq documentation, print it out, and tape it above your bed. Next time you reach for the reset switch on a Linux box, stop your self, type the S,U,B sequence, and watch your system come up as if nothing untoward has happened.
Update: I previously recommended U,S,B but after a bit of digging, I think S,U,B may be correct.
Drupal Hacking
Fri, 19/09/2008 - 2:15pm — tumbleweedI apologise for my last post on this topic, it probably wasn't very interesting :-)
I've done the Drupal 6 upgrade, and it was relatively painless. Most modules ported smoothly, a few required me to learn how to port modules to Drupal 6, and one I just gave up on.
On the whole, the porting is simple, Druplal.org has a pretty good howto on the topic. A few APIs have changed, and that's about it. A great tool to help with this is the coder module, which knows about the API changes, as well as Drupal's coding standards.
I've added the GeSHi module for code syntax highlighting (apologies for the planet-spam caused by this), and I've moved from marksmarty to markdown + typogrify (which I had to port to Drupal 6). I'm not too happy with the geshi colour-scheme and indenting, but it does a good enough job. I should write a "command prompt" mode for it, but that can wait for now...
Akismet is currently totally broken for Drupal 6, even if it's labelled as being in beta. I got about half way through porting it before giving up and switching to mollom, which looks like a pretty good replacement (and it takes care of the sign-up form too).
Finally, the subject of input-filters. Drupal lets you define a "default filter", but that filter has to be available for everyone, even comments. So your default filter has to protect against XSS. I'd much prefer it if commenters used a simple, locked-down input-format, and I used a nice markdown format.
I'm not the only one to notice this, and it seems like it'll be fixed in Drupal 7. Until then, I'm using remember-filter which remembers that I use markdown, and all the commenters use the default, locked-down filter. (Again, ported.)
Fixing a Digital Camera
Sun, 13/07/2008 - 2:57am — tumbleweedMy brother was talking about buying my Canon Digital IXUS 750 Camera off me. (or PowerShot SD550 for Americans) He had an identical camera and waterproof housing for it (this costs significantly more than the camera). But said waterproof housing had not been properly closed once…
My camera wasn’t having any of that, and the next time I turned it on, it half-opened the lens, groaned, and said “E18”. Bugger. Googling E18 turned up a few sites showing other people with the same problem, lots of other people: e18error.com, E18 Error on Wikipedia. It appears to be a generic error for lens problems in Canon cameras, and occurs so often that class action suits have been filed against Canon.
I read the tales of woe, and tried the suggested remedies of shaking, banging, prodding, and otherwise mauling my poor camera. Nothing helped. I put it in a pelican case and forgot about it for a few weeks.
Reading on, I discovered a few tales of brave owners disassembling and repairing their cameras, mostly successfully. As a geek, I knew I was going to have to give this a shot. I’ve taken things apart since I learned how to use a screwdriver, so I can normally put them back together again (these days), and they normally still work.
Eventually, I got around to this, last week. Nobody has posted disassembly instructions for any camera near my model, so I had to work it out for myself. Now, let’s remedy that:
My Symptoms
My camera’s lens was open, and wouldn’t move at all. Turning it on gave an E18 error.
Preparation
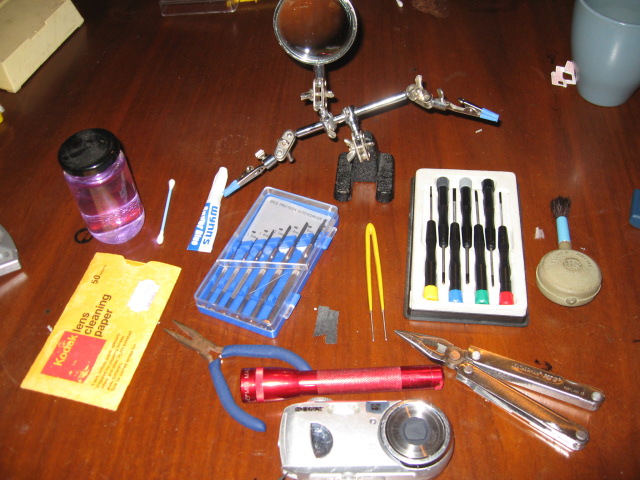
I’d recommend the following:
- An afternoon & evening to yourself
- A large, empty desk (preferably with a lip, to catch dropped screws)
- A lino floor (carpets can lose dropped screws)
- A good desk light
- Lens tissue (or better yet, the wet-wipe version)
- Meths and ear-buds (or other solvent of choice)
- Superglue (in case you break something or something is broken)
- Tweezers, pliers, leatherman, etc. (you are dealing with lots of little things)
- Screwdrivers: small philips-head drivers for screws, and a few tiny flat ones for prying.
- A torch (to help you find dropped screws)
- A third-hand (or at least its magnifying glass)
- A blower/brush (to get rid of dirt)
- A working camera (to document the procedure, so you can put it back together)
- Patience - dropped screws can be hard to find
Warnings: You need to have a willingness to part with your patient’s life. You also need to be aware that camera flash assemblies contain high-voltage capacitors, that usually hold a small residual charge. Stay well clear of them and their circuitry. If possible, discharge it as soon as you see it, with a heavy-duty resistor.
Tips: Lay out the removed parts in the order you disassembled them, together with their screws. That way you won’t have the “left-over screw” problem or put things together in the wrong order.
Disassembly
Remove the battery and SD card.
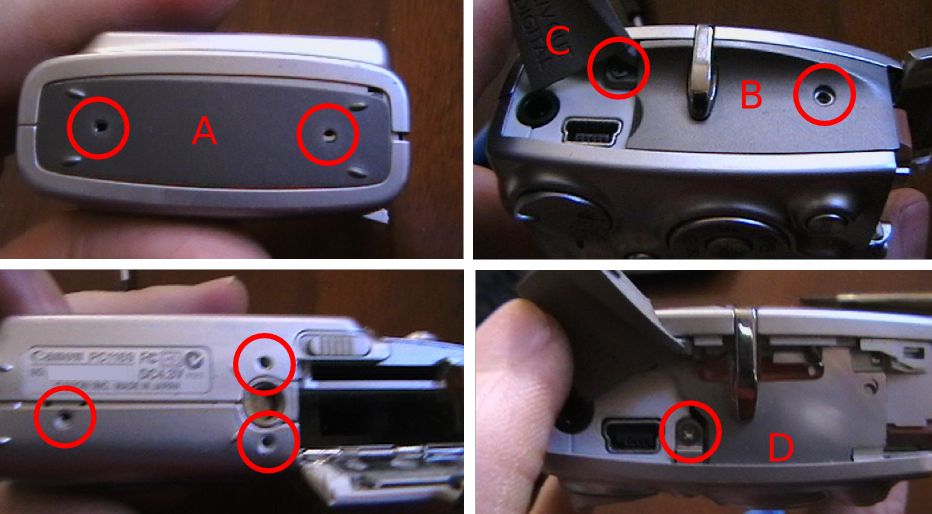
To remove the case, you need to undo all the exterior screws: 3 on the base, 2 on the left, and 2 on the right (one is under flap C). The side plate A is loose, and B is a plastic sheet that can be pulled out, revealing an additional screw. Flap C is attached to the body, not B. When reassembling, take care to insert lip D under the back panel.
There are no clips on the bottom or sides, but there are 3 along the top, between the front and back halves. One to the right of the shutter, two to the left. Pry up on the front half.
There should be a black O-ring on the outer part of the lens. Lift it off and store.
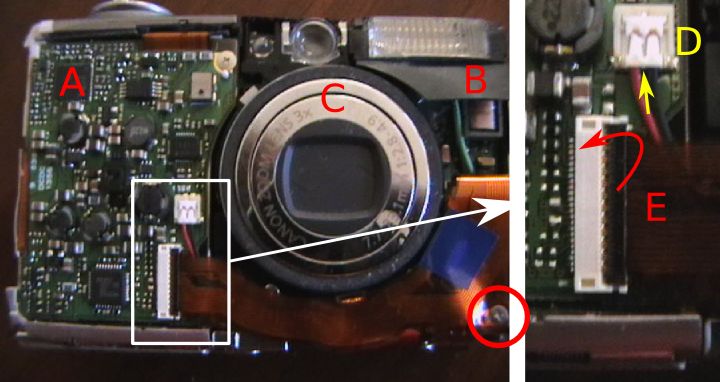
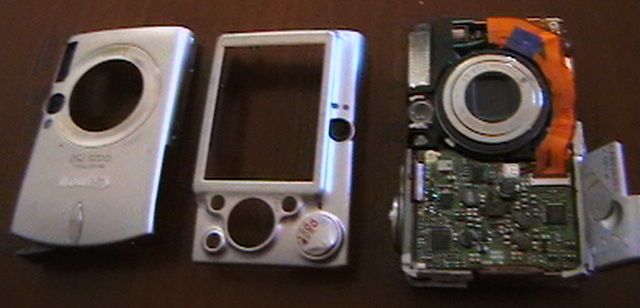
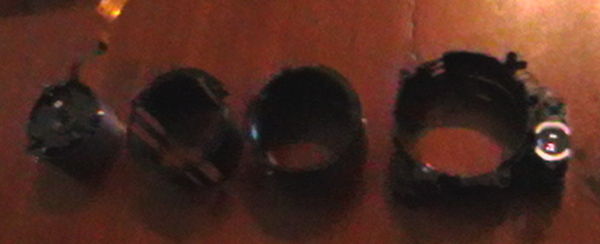
The three main modules are now visible. Motherboard and battery (A), Flash unit (B), and Optics (C). While we won’t undo these connectors quite yet, as the LCD is currently attached to both sides, but this is a good opportunity to explain the connectors that you’ll be encountering.
The ribbon cable E plugs into the white connector with a black lid. The black lid needs to be folded back for the ribbon to be removed. It simply pulls out along it’s axis. To re-insert: open, push in ribbon as far as it’ll go, and close. These connectors are quite delicate, be careful.
There is another type of ribbon connector which simply relies on friction. The LCD back-light cable is an example. You just pull it out with tweezers, and push it back with tweezers (without bending it, if possible).
The flash power lead D must be pulled up, away from the camera. Insert a tiny screwdriver underneath the wires at the point indicated, and pry up.
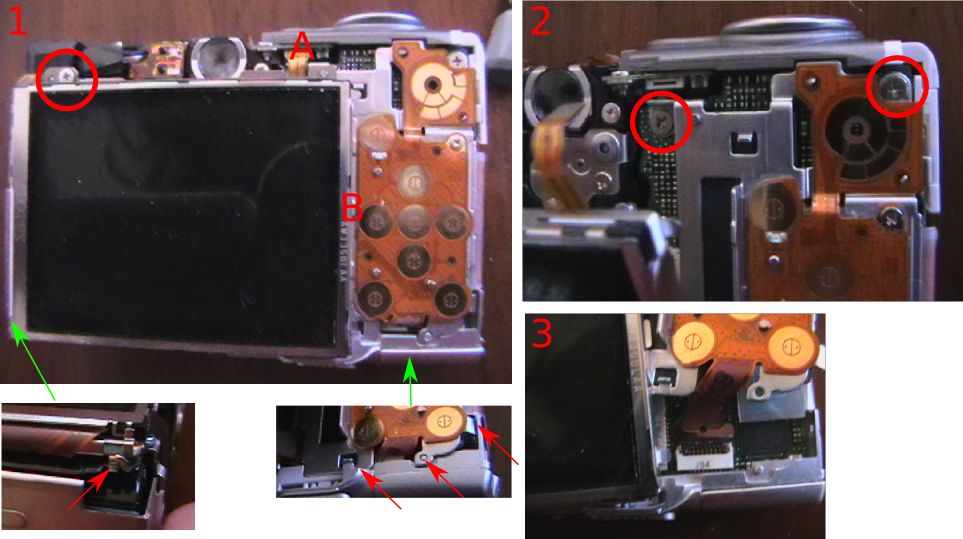
The buttons are a loose piece of rubber. Lift off.
The LCD needs to be removed first. Pull out the backlight power ribbon (A). Unscrew the screw above the LCD, releasing a bar. The left side has a small clip that needs to be released, and then the LCD-backlight assembly should lift upwards. The right hand side has a lip under the keypad module, so lift the left side first. You won’t be able to disconnect the LCD ribbon until you remove the keypad plate.
Unscrew the 2 screws at the top of the keypad plate. There are a few clips holding the bottom in place (arrowed). But you should be able to pull the plate away, revealing the ribbon connectors for both units. Unplug them both.
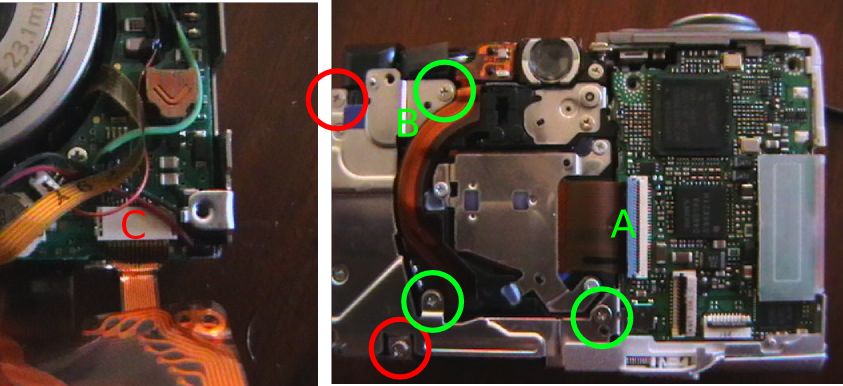
The Flash unit can now be removed. Unplug the cables shown earlier, as well as the screw on the bottom right-corner. The ribbon plugs into the flash unit, unplug (C).
The left two screws on the back (red) will release the flash unit.
Before unscrewing the optical assembly, open the CCD ribbon connector (A). When re-attaching the module, the cable should again be inserted first, and locked last.
The three (green) screws on the metal frame will release the optical module. Beware a tiny spring hiding under B. Lift it out, and store it.
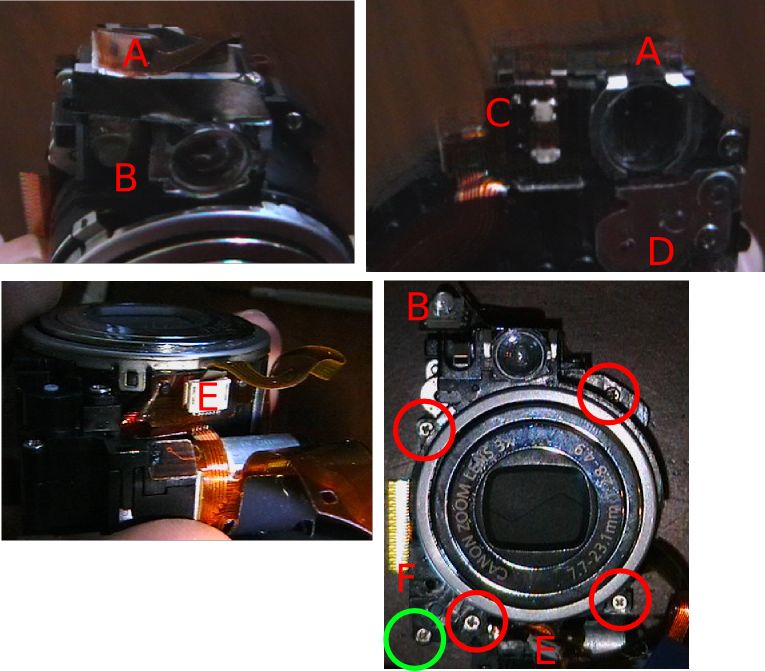
Before we can take the Optical assembly apart, the focussing LED has to be removed. Unstick ribbon A, and pry up the LED (B). Continue lifting the ribbon, unsticking the status LED section (C), too.
While we are here, the focussing servo’s cogs are under D, if you are cog-cleaning. Don’t open if you don’t need to.
Unplug (pull) the shutter-ribbon from E, and unstick E’s ribbon from the lens-body.
The lens and viewfinder assembly can now be removed from the base-plate with the CCD and motors. Unscrew the 4 screws and one on the base. The long screw comes from near F. Lift up the lens carefully. A small black cog will be loose near F. Remove and store.
The green screw gives access to the zoom servo’s cogs. Don’t open unless you need to.

On the CCD base, the sharp bit (A) activates the lens-cap mechanism in the lens, when it’s closed. The lens element (B) is for focussing, and in my case it’s sitting at an odd angle, because the short pin (circled) had broken, and had to be glued back in place. This pin passes through an IR light-switch when the lens is at a certain hight, allowing the camera to calibrate its focus.
Check that the focussing element moves up and down smoothly when you rotate the thread below A.
While you are here, blow any dust off the lens and CCD below it.
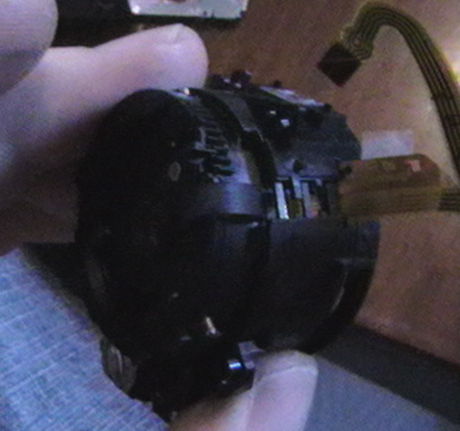
To disassemble the lens: Un-thread the ribbon. Roll the big cog on the side until it’s fully closed, and clicks, revealing the pins of the inner rings, and push the outermost interior ring of the lens backwards from the front. It should pop out.
The rings either simply pop out backwards, or have a track leading to the surface. Clean all the tracks and pins.
If you are having shutter-trouble, you can open the innermost module, but beware it’s delicate. If the lens-cap is jamming, operate it a bit with a screwdriver (wiggle), blow air at it, etc until it works cleanly.
Reassembly
Finally, if you found your problem, reassemble.
Remember to rethread the lens ribbon before you attach the outermost ring. The lens should operate smoothly when zoomed with the big cog. It’s easiest if you attach it to the CCD plate in the opened state.
The camera behaves well, and can be tested disassembled. If you are having E18 trouble, you can just connect the lens to the motherboard, insert the battery, and turn it on. If it’s working, the lens should open, and close when turned off (and the power button LED should go out promptly, if it doesn’t you haven’t found the trouble yet).
Enjoy your newly fixed camera. I am, mine.
Gammu with Samsung
Tue, 29/04/2008 - 10:33pm — tumbleweedA housemate of mine got a new Samsung phone on the weekend. Being a resident geek, I offered to transfer her contacts across rather than get her sister to manually retype 500-odd contacts.
Naturally, I thought this would be a simple problem, right? I mean, everyone updates their phones every 2 years, this must be a pretty common use case. All my Sony Ericsson phones have had a “send all contacts by Bluetooth” option since the inception of Bluetooth. Naturally, it didn’t have such a feature, it only supports sending one contact at a time. (Although, to Samsung’s credit, the new phone will be able to do for the next upgrade)
Next option: I’ll sync old phone to laptop to new phone.
The Samsung website has a helpful Windows utility that you can download to do this, however you need the cable to link the phone to the computer. The phones needed different cables, and I had neither. My laptop with a Windows partition has had broken Bluetooth ever since its motherboard got replaced. So that wasn’t an option. The phones don’t have IRDA, so there was no way to connect them with the Windows laptop.
Time to do it properly.
I tried wammu, a python-based gammu GUI. It supported the phones via the “blueat” driver, and could browse their SIM cards fine, but not their internal Phonebooks. It couldn’t back them up either. A bit of poking around with gammu on the command line showed that the internal phone books are not 0-indexed (normal computer counting, 0 to n-1) or 1-indexed (normal human counting, 1 to n), but 2-indexed. Dijkstra would turn in his grave!
At this point, I could see that I was going to have to write my own, backup utility. The output of gammu was awkable, but seeing as there are good gammu-python bindings, I decided to do it in pure Python.
Reading the address book went something like this:
sm = gammu.StateMachine()
sm.ReadConfig(3, 0)
sm.Init()
old = []
for i in range(2, 587):
old.append(sm.GetMemory("ME", i))
pickle.dump(old, file("phonebook.dump", "w"))
The 3 signifies gammu configuration number 3, read into position 0. 587 is the number of address book entries. “ME” means internal memory. I then pickled “old” in preparation for the next stage. Here is an example of an item in old:
‘Type’: ‘Text_FirstName’,
‘Value’: u‘Foo’},
{‘AddError’: 796160623,
‘Type’: ‘Text_LastName’,
‘Value’: u‘Bar’},
{‘AddError’: 796160623,
‘SMSList’: [],
‘Type’: ‘Number_Other’,
‘Value’: u‘0211234567’,
‘VoiceTag’: 0},
{‘Type’: ‘Category’, ‘Value’: 0}],
‘Location’: 2,
‘MemoryType’: ‘ME’}
Pretty icky, but at least all the information is there. At this point, one should be able to feed it into the new phone:
sm = gammu.StateMachine()
sm.ReadConfig(4, 0)
sm.Init()
for i in old:
sm.AddMemory(i)
However nothing I tried worked, I always got an “Invalid Location” error. I think the 2-indexing is trumping gammu again.
Next idea, lets munge the data into vCard format and use wammu / gammu’s “import from vCard” function. (Code coming up soon) Turns out this doesn’t work either. The phone only received the First name, first phone number, and various other things that I didn’t send it (i.e. custom ring tones that it made up). Hmph!
Aha, but cellphones can normally Bluetooth vCards to each other. So I pushed it the vCard collection via obexftp. Starts transmitting, but then the phone reboots. I played around a bit, and found that if you send it more than one vCard in a vCard file, it reboots. Lovely.
So my final solution was: Extract address book with python-gammu. Transform into vCards. Send each one individually. At least the phone had a “trust this device” option so that it wouldn’t prompt the user for every vCard I sent, but just automatically import them - the first sensible feature I’ve found on it.
Here goes:
import os, pickle, time
def normalise_num(n):
"Neaten up the phone number, internationalise, etc."
if n.startswith("+"):
return n
if n.startswith("00"):
return "+" + n[2:]
if len(n) == 10 and n[0] == "0":
return "+27" + n[1:]
return n
d = pickle.load(file("phonebook.dump", "r"))
# Normalise into a sensible format:
o = []
for i in d:
t = {}
for j in i["Entries"]:
if j["Type"] == "Text_FirstName":
t["First"] = j["Value"]
if j["Type"] == "Text_LastName":
t["Last"] = j["Value"]
if j["Type"] == "Number_Other":
n = normalise_num(j["Value"])
type = "Home"
if n[3] in ("7", "8"):
type = "Cell"
if type not in t:
t[type] = []
t[type].append(n)
o.append(t)
# Write & Send vCards:
for i in o:
f = file("temp.vcf", "w")
f.write("BEGIN:VCARD\n")
f.write("VERSION:2.1\n")
f.write("N:%s;%s;;;\n" % (i.get("Last", ""), i.get("First", "")))
pref = ";PREF"
for j in i["Cell"]:
f.write("TEL;CELL%s:%s\n" % (pref, j))
pref=""
for j in i["Home"]:
f.write("TEL;HOME%s:%s\n" % (pref, j))
pref=""
f.write("END:VCARD\n")
f.close()
os.system("obexftp -b 00:DE:AD:00:BE:EF -p temp.vcf")
# Give the thing a chance to recover:
time.sleep(0.1)
Yes, the normalisation could be done with list comprehensions, but it would be horrible to read. And there might by Python Obex bindings, but I couldn’t be bothered.
I got to spend an afternoon messing with dodgy Cellphones, rather than having a teenager do the job for free. I think I chose the wrong option, but at least it was fun.
Footnote: Samsung, your phones User Interface is awful. Why on earth is Bluetooth under “Applications” rather than “Settings”? I searched everywhere but there, and finally googled before I found it…
Bandwidth accounting with ulogd
Thu, 03/04/2008 - 12:31am — tumbleweedMy post about repositories wasn't just a little attempt to stave off work, it was part of a larger scheme.
I share the ADSL line in my digs with 3 other people. We do split-routing to save money, but we still have to divide the phone bill at the end of the month. Rather than buy a fixed cap, and have a fight over who's fault it was when we get capped, we are running a pay-per-use system (with local use free, subsidised by me). It means you don't have to restrain yourself for the common cap, but it also means I need to calculate who owes what.
For the first month, I used my old standby, bandwidthd. It uses pcap to count traffic, and gives you totals and graphs. For simplicity of logging, I gave each person a /28 for their machines and configured static DHCP leases. Then bandwidthd totalled up the internet use for each /28.
This was sub-optimal. bandwidthd either sees the local network, in which case it can't see which packets went out over which link. Or it can watch the international link, but then not know which user is responsible.
I could have installed some netflow utilities at this point, but I wanted to roll my own with the correct Linux approach (ulog) rather than any pcapping. ulogd is the easy ulog solution.
Ulogd can pick up packets that you "-j ULOG" from iptables. It receives them over a netlink interface. You can tell iptables how many bytes of each packet to send, and how many to queue up before sending them. E.g.
will log the first 48 bytes of any incoming packet to netlink-group 1. It will tag the packet as being "input", and send them in batches of 50. 48 bytes is usually enough to catch any data you could want from the headers. If you were only need size, 4 bytes will do, and for source and destination as well, 20.
Now, we tell ulogd to listen for this stuff and log it. Ulogd has a pluggable architecture. IPv4 decoding is a plugin, and there are various logging plugins for "-j LOG" emulation, Text files, pcap-files, MySQL, PostgreSQL, and SQLite. For my purposes, I used MySQL as the router in question already had MySQL on it (for Cacti). Otherwise, I would have opted for SQLite. Be warned that the etch version of ulogd doesn't automatically reconnect to the MySQL server should the connection break for any reason. I backported the lenny version to etch to get around that. (You also need to provide the reconnect and connect_timeout options.)
Besides the reconnection issue, the SQL implementations are quite nice. They have a set schema, and you just need to create a table with the columns in it that you are interested in. No other configuration (beyond connection details) is necessary.
My MySQL table:
`id` 51&q=INT&lr=lang_en">int(10) 51&q=UNSIGNED&lr=lang_en">unsigned 5.1/en/non-typed-operators.html">NOT 51&q=NULL&lr=lang_en">NULL 51&q=AUTO_INCREMENT&lr=lang_en">auto_increment,
`oob_time_sec` 51&q=INT&lr=lang_en">int(10) 51&q=UNSIGNED&lr=lang_en">unsigned 5.1/en/non-typed-operators.html">NOT 51&q=NULL&lr=lang_en">NULL,
`oob_prefix` 5.1/en/string-functions.html">char(4) 5.1/en/non-typed-operators.html">NOT 51&q=NULL&lr=lang_en">NULL,
`ip_totlen` 51&q=SMALLINT&lr=lang_en">smallint(5) 51&q=UNSIGNED&lr=lang_en">unsigned 5.1/en/non-typed-operators.html">NOT 51&q=NULL&lr=lang_en">NULL,
51&q=PRIMARY%20KEY&lr=lang_en">PRIMARY KEY (`id`),
51&q=UNIQUE&lr=lang_en">UNIQUE 51&q=KEY&lr=lang_en">KEY `id` (`id`),
51&q=KEY&lr=lang_en">KEY `oob_prefix` (`oob_prefix`),
51&q=KEY&lr=lang_en">KEY `oob_time_sec` (`oob_time_sec`)
);
My ulogd.conf:
# netlink multicast group (the same as the iptables --ulog-nlgroup param)
nlgroup=1
# logfile for status messages
logfile="/var/log/ulog/ulogd.log"
# loglevel: debug(1), info(3), notice(5), error(7) or fatal(8)
loglevel=5
# socket receive buffer size (should be at least the size of the
# in-kernel buffer (ipt_ULOG.o 'nlbufsiz' parameter)
rmem=131071
# libipulog/ulogd receive buffer size, should be > rmem
bufsize=150000
# ulogd_BASE.so - interpreter plugin for basic IPv4 header fields
# you will always need this
plugin="/usr/lib/ulogd/ulogd_BASE.so"
plugin="/usr/lib/ulogd/ulogd_MYSQL.so"
[MYSQL]
table="ulog"
pass="foo"
user="ulog"
db="ulog"
host="localhost"
reconnect=5
connect_timeout=10
The relevant parts of my firewall rules:
iptables -A count-from-inside -p ! tcp -j RETURN
iptables -A count-from-inside -p tcp -m multiport --destination-ports ! 3128,8080 -j RETURN
iptables -A count-from-inside -s 10.0.0.16/28 -j ULOG --ulog-nlgroup 1 --ulog-qthreshold 50 --ulog-cprange 4 --ulog-prefix sr-p
iptables -A count-from-inside -s 10.0.0.32/28 -j ULOG --ulog-nlgroup 1 --ulog-qthreshold 50 --ulog-cprange 4 --ulog-prefix fb-p
iptables -A count-from-inside -s 10.0.0.128/25 -j ULOG --ulog-nlgroup 1 --ulog-qthreshold 50 --ulog-cprange 4 --ulog-prefix gu-p
iptables -A count-to-inside -p ! tcp -j RETURN
iptables -A count-to-inside -p tcp -m multiport --source-ports ! 3128,8080 -j RETURN
iptables -A count-to-inside -d 10.0.0.16/28 -j ULOG --ulog-nlgroup 1 --ulog-qthreshold 50 --ulog-cprange 4 --ulog-prefix sr-p
iptables -A count-to-inside -d 10.0.0.32/28 -j ULOG --ulog-nlgroup 1 --ulog-qthreshold 50 --ulog-cprange 4 --ulog-prefix fb-p
iptables -A count-to-inside -d 10.0.0.128/25 -j ULOG --ulog-nlgroup 1 --ulog-qthreshold 50 --ulog-cprange 4 --ulog-prefix gu-p
# Count forwarded traffic (excluding local internet connection - ppp2)
iptables -A count-forward-in -i ppp2 -j RETURN
iptables -A count-forward-in -d 10.0.0.16/28 -j ULOG --ulog-nlgroup 1 --ulog-qthreshold 50 --ulog-cprange 4 --ulog-prefix sr-f
iptables -A count-forward-in -d 10.0.0.32/28 -j ULOG --ulog-nlgroup 1 --ulog-qthreshold 50 --ulog-cprange 4 --ulog-prefix fb-f
iptables -A count-forward-in -d 10.0.0.128/25 -j ULOG --ulog-nlgroup 1 --ulog-qthreshold 50 --ulog-cprange 4 --ulog-prefix gu-f
iptables -A count-forward-out -o ppp2 -j RETURN
iptables -A count-forward-out -s 10.0.0.16/28 -j ULOG --ulog-nlgroup 1 --ulog-qthreshold 50 --ulog-cprange 4 --ulog-prefix sr-f
iptables -A count-forward-out -s 10.0.0.32/28 -j ULOG --ulog-nlgroup 1 --ulog-qthreshold 50 --ulog-cprange 4 --ulog-prefix fb-f
iptables -A count-forward-out -s 10.0.0.128/25 -j ULOG --ulog-nlgroup 1 --ulog-qthreshold 50 --ulog-cprange 4 --ulog-prefix gu-f
# Glue
iptables -A INPUT -i eth0 -j count-from-inside
iptables -A OUTPUT -o eth0 -j count-to-inside
iptables -A FORWARD -i ppp+ -j count-forward-in
iptables -A FORWARD -o ppp+ -j count-forward-out
So, traffic for my /28 (sr) will be counted as sr-f or sr-p so I can tally up proxy & forwarded traffic separately. (Yes, I can count traffic with squid too, but doing it all in one place is simpler.) fb is random housemate Foo Bar, and gu guest (unreserved IP addresses).
You can query the usage this month with for example:
Your table will fill up fast. We are averaging around 200 000 rows per day. So obviously some aggregation is in order:
id 51&q=INT&lr=lang_en">INT 51&q=UNSIGNED&lr=lang_en">UNSIGNED 5.1/en/non-typed-operators.html">NOT 51&q=NULL&lr=lang_en">NULL 51&q=AUTO_INCREMENT&lr=lang_en">AUTO_INCREMENT,
51&q=TIME&lr=lang_en">time 51&q=TIMESTAMP&lr=lang_en">TIMESTAMP,
oob_prefix 5.1/en/string-functions.html">CHAR(4) 5.1/en/non-typed-operators.html">NOT 51&q=NULL&lr=lang_en">NULL,
51&q=DATA&lr=lang_en">data 51&q=INT&lr=lang_en">INT 51&q=UNSIGNED&lr=lang_en">UNSIGNED 5.1/en/non-typed-operators.html">NOT 51&q=NULL&lr=lang_en">NULL,
51&q=PRIMARY%20KEY&lr=lang_en">PRIMARY KEY (id),
51&q=KEY&lr=lang_en">KEY (oob_prefix(4)),
51&q=KEY&lr=lang_en">KEY (51&q=TIME&lr=lang_en">time)
);
And every night, run something like:
51&q=SELECT&lr=lang_en">SELECT 5.1/en/date-and-time-functions.html">FROM_UNIXTIME(5.1/en/group-by-functions-and-modifiers.html">MAX(oob_time_sec)), oob_prefix, 5.1/en/group-by-functions-and-modifiers.html">SUM(ip_totlen)
51&q=FROM&lr=lang_en">FROM ulog
51&q=WHERE&lr=lang_en">WHERE oob_time_sec >= 5.1/en/date-and-time-functions.html">UNIX_TIMESTAMP('2008-04-01 00:00:00')
5.1/en/non-typed-operators.html">AND oob_time_sec < 5.1/en/date-and-time-functions.html">UNIX_TIMESTAMP('2008-04-02 00:00:00')
51&q=GROUP%20BY&lr=lang_en">GROUP BY oob_prefix;
51&q=DELETE&lr=lang_en">DELETE 51&q=FROM&lr=lang_en">FROM ulog 51&q=WHERE&lr=lang_en">WHERE oob_time_sec >= 5.1/en/date-and-time-functions.html">UNIX_TIMESTAMP('2008-04-01 00:00:00')
5.1/en/non-typed-operators.html">AND oob_time_sec < 5.1/en/date-and-time-functions.html">UNIX_TIMESTAMP('2008-04-02 00:00:00');
Finally, I have a simple little PHP script that provides reporting and calculates dues. Done.